GettingStart
Getting Started with Gsym
Download Gsym Binary
Running Gsym
Access to Gsym Node
Creating Account
Request Registration to CA
Using Gsym
Download Gsym Binary
To use Gsym, you need to install Gsym first. You can get the Gsym binary from Symverse download page(https://github.com/symverse-lab/Document/tree/master/bin).
After you download the binary and start a node with some options, then you can use services with JSON-RPC APIs. Please refer to JSON-RPC APIs document( https://github.com/symverse-lab/Document/wiki/JSON-RPC-API ).
Running Gsym
Running Gsym Node
When a Gsym node is started, it runs according to Network ID specified. Network ID "1" and "2" are reserved. "1" is for main-net and "2" is for test-net. Any other network ID means a private network.
If an option of "--networkid" or "--testnet" is not specified, the node will be started as a main-net node by default.
You can simply run Gsym as a main-net node as follow.
For running as a test-net node, run Gsym with "--testnet" or "--networkid 2" option as follow.
If you want to customize some environment such as data directory, ip, port, and so on, you can run Gsym with adding some options. An example is as follow.
For the description of the options, refer to Command-Line-Options document( https://github.com/symverse-lab/Document/wiki/Command-Line-Options ).
Running RPC Server
In order to access to a node in remote, you need to run a node with RPC server when you start it. You can add "--rpc" option for HTTP server, and "--ws" option for Web Socket server. Then you can access to a node in remote and use JSON-RPC methods with a HTTP or Web Socket client program.
Please refer Command-Line-Options for the detail usage.
Access to Gsym Node
Console attach
When user want to access a node, user can use the console.
You can enter the console directly when a node is started with "console" command.
The other way is to use "attach" command out of a node after the node is started.
HTTP
User can use JSON-RPC command to access to HTTP server of node with remote client program. In detail, please check the manual of that program.
The example of using "Curl" is as follow. You can also use your own program.
Web Socket
User can also use JSON-RPC command to access to Web Socket server of node with remote client program. In detail, please check the manual of that program.
Creating Account
Making Keystore with Gsym
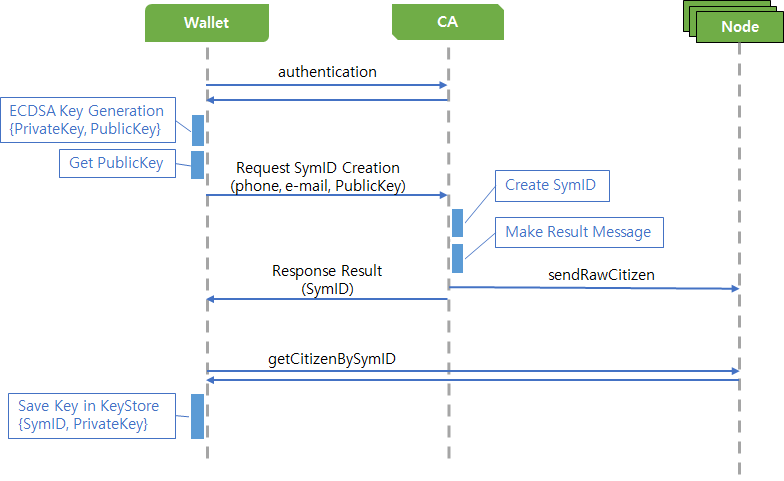
You can make an account with Gsym, however you need to register your account in the blockchain through CA before you use a service of blockchain. Therefore it is recommended to create an account with Wallet for registering the account through CA.
This section only describes how to create a keystore on a node. If you make up your own private network, you can register your account on a CA node after making keystore with SymID and passphrase.
Parameters:
GSYM_PATH: path to gsym binary file
DIR_PATH: path to save the node data
ACCOUNT_ADDRESS: 10 byte address(SymID)
PASSPHRASE: password for generating account
Generate Keystore file:
Extract public key hash:
Example
Save public key hash for requesting registration to CA.
Request Registration to CA
When you register an account to blockchain through CA, you should use CA APIs. Please contact to Symverse for CA APIs.
Note: When user makes an account in a node, the registration of account should be done manually. However it's not allowed the manual registration of account at this moment. Therefore, if user wants to create an account in Main-net or Test-net, user should use SymWallet or develop a program that it can be processed the creation and registration of account.
Using Gsym
Unlock Account
In case of some RPC-API methods such as "sym_sendTransaction", it is needed to unlock account first before using them.
Be careful not to leak the passphrase from your keystore when unlocking your account.
parameters:
Account:byte - 10 byte wallet address to unlock.
Passphrase:string - password for the wallet account.
Duration:int64 - Duration time to unlock account.
Send Transaction
When you want to publish a transaction to blockchain, you can choose two ways.
First way is to send a transaction on the node. In this case, the transaction is signed with private key in the keystore of the node directory.
Second way is to send a RLP encoded raw transaction to a node after making a transaction and signing it. You should manage your own keystore and signing process.
sendTransaction
sendRawTransaction
Appendix
Registration of Account Flow
Last updated
